In this series of articles, I’ve been looking at methods to improve the stereo performance of your surround setup. Previously we considered some simple tweaks to the AV receiver’s configuration and the addition of a dedicated power amplifier. In this article, I’m going to investigate how to connect a stereo amplifier to an AV receiver.
Integrated amplifiers
Looking back at the signal chain music must pass through, the next area to consider is the pre-amplifier. A stereo integrated amplifier is essentially a pre-amp and power amp in one box. By using a stereo integrated amplifier, you can route all stereo sources through it, completely bypassing the AV receiver and take advantage of the better quality pre/power stages within the integrated amplifier.
A dedicated stereo amplifier will give a cleaner sound, due to it containing fewer electronics that can cause interference. It will have its own power supply, again giving better performance. The laws of economics also help us: a £500 integrated amp will easily outclass the stereo performance of a £1000 AV receiver, as the cost is spread between fewer components and features. Finally, for stereo sound, the AV receiver will not be used at all and can be switched off, which can save electricity.
Many classic integrated amplifiers also featured good phono stages, for use with a turntable. Few AV receivers include this feature, and those that do, merely provide a basic implementation.
Connecting It All Up
There are two ways to connect your integrated amp to your surround setup. The first uses a speaker switch to flip between the AV receiver and integrated amp driving the front left/right speakers. The second method uses the integrated amp to drive the front left/right speakers for both stereo and surround material.
Speaker Switch
With a speaker switch it’s possible to flip which amplifier drives the front left/right speakers. The speakers and both amps are plugged into the switch box, which can then manually be switched either way.

Care must be taken that the switch box at no point, mid-switching, forms a connection between the speaker terminals of both amps. Conversely some amplifiers without protection circuits can potentially be damaged when powered up with no load present on the speaker terminals. Thus, with this setup it is always best to turn off both amps prior to switching.
The big disadvantage of this approach, is you’re not taking advantage of the integrated amp when playing surround sound material. It simply isn’t used and the AV receiver drives the front left/right channels.
Using Integrated Amp as a Power Amp
The second method effectively uses the integrated amp as though it is a power amp, for surround sound material, similar to the setup described in the last article in this series. While for stereo sources, the integrated amp is used in isolation. To do this, you should connect all surround and digital sources to the AV receiver, and all analogue stereo sources to the integrated amp. Then the front left/right pre-out of the AV receiver needs to go to an input on the integrated amp, as it will be driving the front left/right speakers for surround sound material. Thus the front left/right speakers are plugged into the integrated amp and the other surround speakers left plugged into the AV receiver.
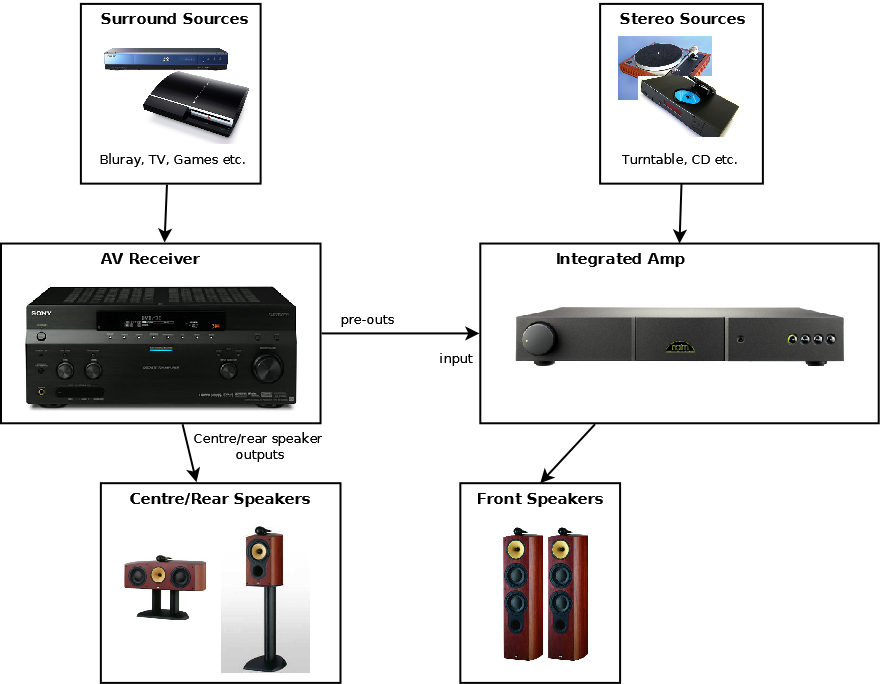
When using an analogue stereo source, you only need to turn on the integrated amp and select the appropriate input (only right-hand side of the diagram above is used). When listening to surround sources, you turn on both amps, on the integrated amp select the input connected to the AV receivers pre-outs and then adjust its volume accordingly. It’s getting this volume correct that is crucial.
How to Connect Stereo Amplifier to AV Receiver
This is achieved by connecting the AV receiver Front Pre-Outs to stereo integrated amp input.
Some stereo integrated amplifiers have a special input, called ‘unity gain’, ‘AV pass through’ or ‘home theatre (HT) direct’. This input will bypass the integrated amplifiers volume control, effectively using the amp as a power amp only. Just plug the AV receivers front left/right pre-outs to this special input. All other stereo inputs will continue to use the stereo amps volume as normal. This is a great feature, as it saves having to adjust the volume on the integrated amp whenever we wish to listen surround sources.
Note: some amps have this feature as a switchable option on one input.
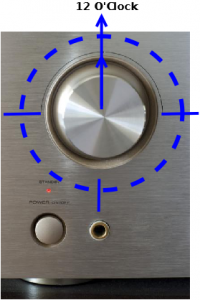 However, if your integrated amp doesn’t have this unity gain feature, all is not lost. Connect the AV receivers front left/right pre-outs to any input on the stereo integrated amp (avoiding any phono /turntable inputs!). Right now, you’ll find the volume too quiet on the front channels for surround material, so crank the integrated amp’s volume up to 12 O’Clock, then calibrate the speaker levels on the AV receiver. The integrated amp is now applying little volume attenuation, so is acting like a dedicated power amp. When playing stereo material, it’s important you turn down the volume, as it will likely be too loud and may damage your speakers and/or ears!
12 O’Clock is chosen, purely as a memorable point on the volume gauge that can be returned to easily when playing surround sound material. However, almost any point on the volume control will suffice. Some people apply stickers to mark the point. So long as you consistently return to the same volume, that the AV receiver was calibrated against, the levels will be correct.
Separate Pre-Amplifier
As mentioned above, a stereo integrated amplifier is essentially a stereo pre and power amp in one box. If desired, the setup described here could be implemented using a separate pre and power amp. If you’ve already followed the advice of the previous article, you may have a good stereo power amp and so will be halfway there. Exactly the same advice and setup is applicable to a separate pre-amp.
Conclusion
Adding a stereo integrated amplifier to your setup is a straight forward addition, that can yield some big improvements in stereo performance. It is preferable to choose an amp that has the ‘unity gain’ feature to keep things simple and easier to use, especially if your setup is used by others members of the house who may not remember to adjust the volume accordingly or turn off amps prior to switching speakers. However looking only at amps with unity gain, may limit your choice too much.
Stereo Amplifiers with Unity Gain/AV Pass-Through/Home Theatre Direct Input
Below is a list of stereo amplifiers that have a unity gain feature. Well worth looking out for, as it saves the hassle of constantly changing the volume to 12 O’Clock when listing to surround sound sources. All the amps below can be switched into unity gain mode, to act like a power amp. Excluded from this list are amps the merely have an external loop at the rear connecting pre and power amp sections (e.g. Nad C326). Although these amps can act as a power amplifier, cables need unplugging and swapping to switch between normal stereo mode and power amp mode, making them impractical for this use.
- Arcam A18, A28 and A38 (called processor mode)
- Arcam A75+, A80, A85, A90
- Audiolab 8000S
- Cambridge Audio 740A, 840A integrated amps and 840E preamp (each input can be configured to be fixed gain)
- Cyrus 6a, 8a (by naming an input ‘Cyrus AV’ or ‘AV Direct’)
- Denon PMA 1500AE, 1510AE, 2000AE, 2010AE (called power amp direct mode)
- Harman Kardon 3490, HK990 (called Processor mode)
- Lector ZOE tube line preamplifier
- Leema Tucana II
- Naim Nait 5i
- Naim NAC 252 (pre amp)
- Marantz PM-7003, PM-8003
- Marantz PM-KI Pearl Lite
- Musical Fidelity A3.5
- Musical Fidelity A5
- Primare A10 (manual switch on rear)
This list is by no means exhaustive. Please get in touch if you know of other examples.
Hi,
I am just ordered ATC CD2 /PRE AMP + ATC P1 power amp combo waiting for delivery. My AV amp is Cambridge Audio 650R with RCA pre out. Not sure whether unity gain is available on ATC, can you advise how to connect.
Larry
HI would it be possible to use two integrated amps to drive a surround setup? I’m kind of a cheapskate bc I don’t have much tot spend. But I would like to order two pairs of XTZ speakers with a center and a small sub. But amplifiers are just too expensive if you want a good one. I guess you need some sort of dolby decoder to split the surround source first
You’re right in saying you’ll need a Dolby decoder to handle surround sources. Two integrated amps could be used, but only for stereo analogue sources or as power amps. However you’ll still be short of a power amp for the centre.
If you’re on a tight budget, I’d go for an old surround receiver. Non HDMI receivers go very cheap these days. This will get started and can be upgraded later. Just get one 5.1 pre-outs.
Hi – thanks for the great article. I am seriously thinking about adding surround sound back to my hi Fi system – I’m using an Cyrus 6a, but like the idea of speaker switching option. Which speaker switch should I buy? From what I’ve seen so far they I have found them that will cover one amp to multiple speakers, but looks like I will need one dedicated to switching amps only. Thanks, Adam
I have an Onkyo TX-SR706 AV receiver, SAE 2200 Amp, SAE A301 Amp, SAE P101 pre-amp, 5.1 surround sound plus two stereo speakers. I plan to add a phono and CD player to the system. Is there a way to connect this conglomeration into a functional home theater setup with analog stereo capability? I also have a home theater computer that could be worked in if needed. I could add another power amp and monobloc it for thunderous sub-woof if there’s a convenient way to rig the whole thing up.
Ok here it goes I have a Onkyo txnr509reciever it is 5.1 surround but has cappability for 7.1 the thing is I have necessorory speakers but I need a amp to power the surround back speakers Ineed amplifier I just don’t know what to do or get 2 4 6 channel I have Bose 901series 6in front Boston Accoustics MC5 center surround and surround back and a Mirage PS 12- 90 subi feel I have the makings for a good home theatre system should I ge a 2 channel amp just for the 7.1 or should over a 4 channel I just don’t know what amp should I get and how exactly how should I utilize it please help limited budget also please help this is driving me nuts any advice you could offer me please
All Bladelius Int.. Amps Have a Surround Processor Mode.
And I’m a happy user, so I have a completely integrated surround and stereo setup, at the such of a button. 🙂
Using the integrated amplifier as power amplifier description was quite self explanatory wow thanks for writing such a wonderful article. Keep up the good work and keep writing!
Brilliant article. Considering that most people watch and listen to music in the same room i am suprised and frustrated by the lack of articles dealing with the topic of combining music and AV equipment. What’s the best way to think about building a combined system ? The advise seems to be to keep the speakers within the same brand to ensure a good tonal match. But if your main focus is music over AV then adding surround speaker kit to match good floorstanders will end up eating a lot of a budget. How should one go about building an AV system off a music base? I recently demo’d some Monitor Audio Golds (GX) with a Denon AV 2313 and Audiolab 8200P poweramp & REL T7. The AV experience was brilliant, but music was a bit disappointing, lacking depth on the lower notes. I couldn’t help feel that the main focus of the £5-6k budget was going on the AV when realy music is of most importance. The proof is clearly in the listening, but is there a good rule of thumb in terms of how much to spend (proportionaly) on the front speakers vs surrounds, AV and poweramp? With my test experience i’m lost as to where to go next.
Great article!!!. It is very well written and definitively helps many people simplifying their lives dealing with watching/listening HT and stereo signals. I have a question: where do you get the output signal from the AV receiver (most modern AV receivers that I know have what they call “zone 2” pre-outs but they only process analog signal). So if you try to input into an amplifier that signal for the front speakers, you don’t get the digital signal generated, i.e. by a blu-ray, do you? . I’m going to try it with my krell kav-300i, Onkyo TX-NR414, krell cd-250i and B&W nautilus speakers and see what I can get.
You need an AV receiver with pre-outs for the front stereo channels. The pre-outs will have an analogue line level signal after the digital stream has been decoded, processed and after volume attenuated. Your Onkyo TX-NR414 only has a pre-out for the subwoofer, so you won’t be able to use it setup as I described in this article. This is common for budget AV receivers I’m afraid.
As you’ve found out, the Zone 2 output is commonly just a pass through for analogue inputs.
Great article. I have the Onkyo NR626, there is pre-out for sub and ‘Line out, Zone 2’ next to it. Is this what I need to run my Musical Fidelity E10 Integrated Amp in the matter you mention in the article? I’m going off to Google the same question now too! Thanks, Rich.
Brilliant article. Can you assist me here?
I have Marantz PM-KI Pearl Lite with Marantz SR7010 AV receiver.
SR7010 has pre-outs for the stereo channels, but I am not sure which inputs should I use at Marantz PM-KI Pearl Lite?
Audio Analogue’s Crescendo also uses this integration method – they call it the “by-pass mode”
First of all, good article, I think many people have the same issue.
My question concerns the subwoofer.
I own a satelite speaker system with a subwoofer.
My satelites go down to 80 Hz, so for good stereo I need the sub.
Is an external power amp my only option to improve stereosound?
And is the difference in quality substantial or marginal?
My reciever is a HK AVR5000 (has pre out, but no analogue bypass that I know of)
My requirements are subtly different. I am setting up my girlfriend’s HT system. She has my old Yamaha RX-V595aRDS, bought new around 2000. It has all six pre-outs. I’m just using the front 2.
The main speakers are a set of three mid 90’s era Monitor Audio (MA) Baby surrounds, two bookshelf size on stands, with a larger but matching centre, £70 about 5 years ago secondhand. The rears are MA Radius 45’s, borrowed from a 6 speaker MA Radius 360 set up and about 4 years old. They are tiny 4” square cubes. I also loaned her my Tannoy mx-10 powered sub bought new with the amp circa 2000.
This is a makeshift speaker arrangement as I will loan her my floor-standing Monitor Audio Gold 14 Mkii s, once I have my classic Tannoy Gold 15 Lancaster’s refurbed.
So as a would-be/part-time audiophile I normally only have the TV Box (Tivo), DVD, Blu-ray and PS3/Xbox/Wii through the AV amp. However with such small fronts I must use the Sub for all sources. This means the CD & Ipod dock must go into the Yamaha AV amp too as that has the Sub hooked to it. Once the floor-standers are in place the CD & I-pod can go directly into an integrated amp.
In keeping with the ‘El-Cheapo’ theme of this set up, the integrated amp is a mid 80’s A&R Cambridge Arcam Alpha. This is not audiophile quality but its neutrality was a quantum leap over the Yamaha’s bright sound through the fronts. The Alpha can be found for about £40 these days. As the Baby fronts are rated at 4 ohms I set the Alpha volume to a cooler 40% or 11 o’clock, it has no by-pass mode. I then control inputs and volume via the Yamaha remote. I never touch the Alpha amp, it now only has the two analog cables (Linn) into it.
The sound is so much better I now switch ‘effect’ off to just drive the 2 fronts and only use 5.1 for DVDs and 5.1 HD broadcasts. The internal DSP seems dated and inferior compared to DTS & DD. I can also mess with the Disco & Rock Concert settings if the i-pod compression lets some songs down.
I leave the Yamaha tones at 12 o’clock (flat) and tweaked the tones on the Alpha to about 2 o’clock on each. The sub cross-over is at 90 Hz the Yamaha is preset to 90 Hz. The speakers are all set to small, and Bass set to Both (mains & sub).
It’s making the best of available resources in these recessionary times.
Like your style! These mixed and matched approaches may not be the most elegant, but can sound surprisingly good.
First tip, can your sub be driving from a high level input, direct from the speaker terminals of the Alpha?
Many subs can have both high and low levels inputs. If so, I suggest you switch the Yamaha AV amp to pure/direct mode for music, which will of course bypass the digital bass management workings and give you no sub output. But, in this situation you’re going to drive the sub from the Alpha’s speaker terminals. You will need to some careful tweaking of volume/crossover point on the sub, to ensure there’s no overlap or gap between your front speakers, other you’ll get a bass hump/dip.
Now, going back to digital surround sources, your sub will be driven both by the front channels and the sub pre-out. So you’ll need to go back and tweak the bass management settings. To get things really spot, I suggest hooking up a mic/sound meter and laptop to the amp and run the (free) application Room EQ Wizard (REW), to measure the frequency response and ensure there is a smooth (ish) EQ curve with no bass hump or dips.
Thanks for the speedy reply and this useful article in general.
My Yamaha doesn’t have a direct mode, it has ‘Effect Off’ though. The tone controls still work with it on ‘No Effect’ for 2.1 output.
My Tannoy MX-Sub 10 has two input options. Firstly L & R RCA Line In inputs, with R nominally chosen to connect to the Yamaha AVR Sub pre-out. That is the only connection used for now.
Secondly there are two sets of speaker cable binding posts, labelled ‘From Amp’ and ‘To Speakers’. I remember using these when I only had the Yamaha, and used the vintage Tannoy Gold Monitors, Tannoy Mercury centre plus Tannoy Mercury rears wall mounted. I remember my flatmate (a hi-fi agnostic) and myself being blown away. The engine room scene from ‘Titanic’ had us totally immersed, truly stunning in DTS.
I don’t recall how I hooked it all up exactly, it was over a decade ago. On one site (Axiom Speakers) the general advice was to use 4 speaker cables , two from the amp and two to the front speakers. Then I can adjust the crossover & volume on the Sub. With the current Yamaha pre-out RCA cable I only need the volume at about 15% or 9 o’clock (i.e 7 o’clock is nil, 5 o’clock is max 150 w peak). The crossover ranges from 50 to 150 hz, its on 80. Any higher makes overall sound muddy.
So I assume I just unplug the speaker cables from the speakers and plug them into the Sub ‘From Amp’ connectors, then get equivalent cables (yet to find or buy) and run them from the Sub ‘To Speakers’ outputs into the fronts. And ‘Viola!’ it should work. I think I did this in 2000 as I worked with a German IT guy who wrote an Audiophile blog, and I recall getting his advice. The Sub also has a safety limit switch which is set to on. You don’t suggest disconnecting the RCA ‘Line In’ cable as it is needed for digital sources.
So the signals will already be amplified by the Alpha and thus taking on the better Arcam sound character. With the existing line in volume already set so low, will it be further boosted by the Alpha meaning I will need to reduce the Sub volume even lower than 15%? Will the line in RCA only handle LFE signals?
The Alpha has two sets of speaker outputs, not used the other outputs as they are something to do with headphone only or headphone and speakers.
So please confirm I have got this right and I should use BOTH line RCA & speaker cables?
I have a Yamaha RX-V3800 AV Receiver and would like to use it in my business (a restaurant) to drive 6 speakers. Is it possible to turn off the “surround” feature and use it as a normal 6 channel amplifier? Yes I’m new at this stuff and would appreciate any feedback.
Cheers, Allen.
Yes you can. You need to select ‘Party’ mode. This will convert all input to mono and send the same signal to each speaker channel. Which is probably best suited to a restaurant setup, where speakers are placed all around to provide background music.
How do I know that an input is phono/turntable or not? I’m looking to buy a Vincent SV-237 and I’m in doubt whether it can be used as a power amp for a AV receiver with pre-outs?
Nice amp, that Vincent: http://www.vincent-tac.de/en/product-lines/tubeline/sv-237.html
According to the specs it has ‘Input: 5 x stereo RCA, 1 x USB’, thus it doesn’t appear to have any phono/turntable inputs. In which case you can feed your AV receivers pre-out to any of these 5 stereo inputs.
Thanks for the quick reply!
Very usefull article.
In a part 1 you say: ”A related, but alternative set-up, would be to use both a separate power amp and the power amp stage of your AV receiver. If your speakers have bi-wireable terminals, one could drive the high frequency tweeters with the AV receiver and the low frequency bass drivers with a separate power amp. This bi-amp setup presents only the tweeters or bass drivers to each amp, giving each an easier load, pushing them less and resulting in better performance.”
Do we need to remove the jumpers that connect the dual binding posts? In that case, dont we need to use an external crossover? I mention it because, ,as i know, feeding the tweeters with low frequencies and , feeding the woofers with high frequencies may damage them. So , is it safe enough to give it a try without an active crossover?
Please see my last reply, regarding an external crossover and why it is not necessary.
You are correct, in a bi-amped setup, you will need to remove any jumpers between terminals on the back of your speakers, otherwise you are effectively connecting the outputs of the two amps to one another… eeek!
Indeed, you are right. But i have one more question!
When we remove the jumpers, the internal crossover of the speaker continues to work or is it bypassed?
Hi
I own a Yamaha DSP-AX3200 surround sound amp and a Pioneer A-868 integrated amp.
Both amps are rated at 120 into 8. Do you think that they would be compatible together in a
side by side hook up.
Thanks
Can someone guide me please. I want to use the same AV receiver and 5.1 setup in a manner that it gives two speaker setups, to enjoy Home projector on the left side and LCD TV in the front by sending different feeds to same speakers, so that the left front speaker becomes right front speaker and left surround becomes left front and similarly. I need just a switch to change the feeds and back to initial setup.
thanks and regards
Hello everybody,
I have been thinking about connecting AV Receiver with an integrated stereo amplifier via pre – outs.
The new setting will be ok as far as home cinema performance is concerned.
However, there is one problem with music.
Apart from stereo CDs, I listen to a lot of SACDs and DVD-A in 5.1
I will connect the front speakers to the stereo amplifier ( the rest will be hooked to AV receiver).
Will it occur that (while listening to 5.1 SACD) the front speakers will be performing significantly better than the rest of the set. And as a result, listening effect will be spoilt???
In audiophile surround (5.1) music, it is important to keep all the speakers on the same level of quality.
Will the new configuration make any negative impact on the listening experience of music in 5.1 (bearing in mind that fronts are amplified by a dedicated good amplifier)?
Or will it make no difference?
Can anyone please help me to resolve this issue?
I will be grateful for any comment and help.
Best Regards
I have NAD 375BEE with PreOut 2 and Volume control at back. Is this same as unity gain/AV pass?
See the images for NAD device http://www.techradar.com/reviews/audio-visual/hi-fi-and-audio/amplifiers/nad-c375bee-625300/review
Hi !
I would appreciate if you could help me on this matter :I do have a stereo receiver JVC XR-750V, but don’t know how to use the pre amp out lets, my first intention is to use it as a out put audio. Can you please enlighten me !
Thank you and best regards !!
Hi there, great articles. I recently bought a Marantz PM6005 for vinyl and listening to music via my Oppo 103 BR/DVD/CD player and Pioneer vsx921 surround receiver. The Oppo has a Wolfson DAC so it will play all my hidef files..
My question is thus:
I will be using the pre-amp out to connect the Pioneer to the Marantz and have HDMI from the Oppo to the Pioneer for surround and RCAs from the Oppo to the Marantz for stereo, will I still be able to play DVD-audio and SACD in surround via this setup??
Yes that’ll work. The Oppo and/or the Pioneer will decode the surround sound mixes from the DVD-A/SACD’s. The front two stereo channels will then be sent to your Marantz, whilst the other channels will be amplified by your Pioneer.
This article is simply the best.
Thanks you very much for it.
Quick question, I would like to receive your comments about this configuration that I want to build:
1- Yamaha AVENTAGE RX-A740
send the pre-out to
2- Arcam A19 Integrated Amplifier
My question is if this yamaha is not to much equipment for what I am looking for (50%video/50%audio). could you advice any other A/V receiver?
Thanks a lot.
Pablo.
hi thanx for a very informative article.
i have denon x2000 avr with B&W 683s2 fronts and B&W center plus Boston a26 rears.
i am planning to go for nad 356bee dac as integrated amp. will the mentioned connections work with this setup? also where do i connect my ipod (as the denon also has ipod plug play)
pls reply
Can you use a DAC in the receiver/integrated amplifier setup?
Hi
I first wrote in June 2013 about an ‘El Cheapo’ HT/2 Channel set up I did for my girlfriend. Thanks for the encouraging reply but it may have caused a ‘Super-Infection’ of the ‘Hi-Fi Hunter Bug’
Since 18 months ago things have moved on as she has ungraded from the 1999 Yamaha RX-V595aRDS and 1984 A&R Cambridge Arcam Alpha and 90’s MA Baby Fronts and Centre with a 2001 Tannoy MX10 Sub. A year ago I sourced her a 2000 era Nakamichi AV10 then a job lot mid 90’s Naim slimline olive NAC 92/NAP90/CD3 system complete with early 90’s Rega XEL speakers and Naim NAC5 cables, we just added a Flat-cap to power the NAC92 pre-amp externally. Total cost was a reasonable £900 including petrol for 3 collections.
My question is how best to connect her Apple I-Pod in its Kensington dock to the amps?
The CD3 is away being serviced So the I-Pod is my only music source for now.
To most Naim users having an MP3 player in the same postcode as Naim gear is sacrilege, but this has been forced on me and is temporary. I’m not expecting amazing results compared to the CD3 but from a Hi-fi-curious view I’d like to know about two options.
The dock is currently in the Aux on the Nak AV10 which is pre-outed to the NAC92 pre-amp’s VCR input with 2 RCA to 5 pin DIN. The pre-amp has no Unity Gain so I must adjust the volume which I set to 11o’clock. For CD its around 8.
Does not having Unity Gain (fixed volume) mean the Nak is sending processed signals to the pre which is then processing them again before they go to the power amp? If so the I-pod sound may not sound as good compared to if it went direct to the power amp via the Nak pre amp section?
I am thinking of connecting the dock directly into the NAC92 via Tape or Tuner inputs (I know not to try Phono!) using a 4 lead RCA to 5 pin DIN tape connector I have. I need to use a double female RCA link for the dock output leads and 2 tape input leads with a 5 pin locking DIN. Can I expect to hear much of an improvement in terms of the Naim Pre which is now effectlvely doing the old job of the Nak Pre section? I can still adjust volume and tracks with the Kensington dock remote, but I lose better volume control with the Nak remote and can’t just leave the Naim preamp on VCR all the time for TV, gaming and I-pod, but a small price.
Is there any danger of damaging my Naim gear or speakers with this change? Would any theoretical gains be marginal as the Nak is a wonderful AV amp which cost £800 in 2000, and has an excellent processor, but is this overridden by having another preamp in the chain? Maybe the NAC92 does just pass it through to the NAP90 albeit via the volume and balance circuits without re-processing? Also which DACs will do what in each case?
Thanks Paul
I see nothing wrong with your plan of hooking up the iPod dock direct the the NAC. However I suspect there will be negligible improvement in sound quality as the compressed source media and DAC in the iPod will be your bottleneck. By all means, give it a go let your ears decide (or preference to convenience). Personally, I’d be more inclined to investigate methods of digital output from the iPod into one of the NAK’s SPDIF inputs.
Thanks for the rapid response.
I agree the Apple DAC is the weakest link. The different sonic characteristics of the Nak or Naim preamps may be subjective and only subtly different quality-wise.The Nak DAC is over 12 years old so it would be an interesting test comparing it to the 2008 (?) Apple iPod Classic 160GB 2G’s Wolfson WM8721 DAC.
I’m looking at new and used Digital Docks they vary from £20 – £100 for older ones. I just need a straight Co-axial Spdif digital output none of this Airplay, PC related add-ons. There are a few brands making them, from Cambridge Audio, Onkyo, Pure, Arcam up to Wadia.
Some have their own DACs but I don’t need this unless I wish to connect to the Naim Pre, but they cost a lot more. I’ll let the Nakamichi ‘Harmonic Time Alignment’ DAC do its thing. I expect similar quality sound to my PS3 when playing games, watching Netflix or blu-rays connected by Optical. In fact Co-axial may marginally improve it.
Don’t know if I’ll bother with going via the Naim pre, I’m afraid it will only show up more compression flaws and more faithfully reproduce what is already lo-fi sound. But the double RCA connector was only 99p, I forehear a marginal change if I go Dock to NAC92 but your Digital Dock spdif idea could reap huge dividends.
Cheers Paul
Hi Admin, I am using Anthem 510 as AV Rcvr and Integrated Musical Fidelity M6si for my stereo musical reproduction (source: CD transport (Integra) and separated DAC (Chord) connected in CD selector. The M6si has an Aux1/HT selector (my L/R speakers are connected to my M6) which is meant to balance volume between the two amps when needed, right? But for some reason, whenever I am watching TV (sourced from my Anthem) any of the 5.1 digital sound comes out perfectly from my 5 spkrs but I have noticed a great number of material that seems to have been encoded in stereo (like many ads, some programs, some channels, etc…). Whenever this is the case, my center shuts off and my L/R speakers are so low volume I can hardly hear that material… even though I have connected two quality RCA cables from M6 Aux/HT selector into the Anthem’s Front L/R RCA’s pre-out. My question: why is this happening since the Aux/HT should be taking care of balancing volumes so I shouldn’t notice the center spkr shutting off and the R/L s^krs taking over? I’m confused…! What am I missing here??!? Thank you so much for helping me out! Denis
Hi – just came across this post and it was very informative and relevant to a problem I’m trying to solve. While I’m not as educated as many on this site, I was hoping to get some guidance/advice/opinions on what makes the most sense. Currently I have a turntable connected to a vintage HH Scott integrated tube amp that has been re-conditioned (believe it’s a 222). The Scott is connected to a pair of Klipschorns. I’ve paid attention to room treatments, and for vinyl playback the sound is quite good. In addition, I have a relatively basic home theater with a Harmon Kardon AVS 635 and Boston Acoustics. While that is fine for movies and television, we primarily watch concerts, and would love to take advantage of the more “live” sound that the Scott and corner horns provide. The Harmon Kardon does not have pre-outs – so the main question I have is what makes the most sense to try to achieve this? Should we look to purchase another receiver with pre-outs and dedicate it to that, keeping TV and normal movies separate from the music we watch (if so, any suggestions on decent equipment would be much appreciated)? Is it possible/desireable to run the stereo outputs from the DVD player directly into the Scott amp? Is it even worth trying to improve things at all with the current situation, or should we just start from scratch? Again, any info/insight to point us in the right direction would be great. As I said, this has been a very educational site. Thanks in advance.
Hi; Great article; very useful!
I have a question though; I just hooked up my Harman Kardon AVR255 through preout (FR & FL) to Stereo amplifier (Harman Kardon HK620). but i get no signal on front speakers. I tried different inputs on the amplifier (CD, Video, Tape etc) and it only works on Phono. But the sound is not the best (a lot of bass) and i suppose it should be only used for direct link to turntable.
What could be the reason that i don’t get the signal on other inputs?
Just to add that all these inputs work fine when connected directly to CD and other sources.
Thanks
Kris
A quick update. I bought a used Pure I-20 Digital Dock for £40. The remote works very well. It is now achieving amazing results going via the Nakamichi AV10 Co-axial. The I-Tunes bought tracks really stand out compared to the CD copied tracks, this wasn’t as evident when using the analog connections. By the way the analog into the Naim NAC92 was a big improvement over analog into the Nak. I tried the Pure I-20’s DAC into the NAC92 and found it worse than the Apple’s DAC, distorting at lower volume. So I could have bought any Digital Dock without a DAC such as the Onkyo or Cambridge Audio which are just Transports.. The Nak DAC beats the Pure & Apple DACs hands down. Thanks for the advice!
Paul
So I have a Linn Majik I that has no unity gain. I’m thinking of buying a used denon 4520…..
Have I got this correct….you set the volume on the Linn say 70… Then you calibrate the system so the Denon sets the other speakers levels to match the linn level.
If that’s correct doesn’t that mean that you have to watch every movie at the same level???
Or adjust the linn level on the fly, which means your adjusting by ear when you go up or down on the linn.
Any advice on level adjustment would be great….
One of the most helpful articles I have ever read. Thanks to the author. After reading this I bought an Onkyo TX-NR709 having all 7 channel pre outs and connected to Arcam Alpha 7R hooked up with Celestion C3. Setup was straightforward. It reduced number of speakers and I placed them all in the same rack. Wonderful.
REF: Stereo Amplifiers with Unity Gain/AV Pass Through/Home Theater Direct Input.
This list is by no means exhaustive. Please get in touch if you know of other examples.
Here is one.
I connected my Onkyo TX-NR808 FR, FL & Center preouts to My Sony STRG800’s
Multi Channel inputs and used the button on the front “Multi Channel Direct’ button. And I now have set 2nd amp(sony) powering all three no distortion. And also have all speaker volume control with the main volume control on Onkyo. sounds great ..Depth and Sound stage finally excellent.. all that I have to do is power up the two units on start up. But i think i can power up both at same time using remote programming options. Thanks for this article and advice it helped a great deal…. Chris
Does anyone know the model of the speaker switch? The one that is shown here looks like the QED SS21 but this is a switch between two SPEAKERS, not two AMPS. The idea is you run the cable from the amp and then connect two different pairs of speakers and then use the front panle buttons to switch between the two speakers, but not two amps.
Any thoughts on what the actual switch between the two amps can look like? Thank you.
I have an Arcam AVR 600 (av surround amp) with pre-amplifier audio outputs. It sounds much better when passing the audio through my Audio Note Valve amplifier and matching speakers from the pre outs, however, the sound from the AVR 600 is also coming out from a separate set of speakers simultaneously. I can simply unplug them, but is the AVR600 not trying to power the second set of speakers too and thus by unplugging them acting like for example, a car in neural revving its engine but doing nothing? Does this not damage the AVR 600 power amp over the long term?
i have a yamaha ax-900u and would like to separate the preamp from the amp and put them in there own cabinets. I want to just put my name on them. Ddoes any one give me instruction how to?.
thx,
fredc
What happened to the ” ears ” in image no. 2 and 3 ?
And on the serious side:
Great reading this. Explaining a lot to me (and also the guy in the hifi store…. )
Here you can find the longest list of amplifiers whit unity gain feature or how they call it HT-bypass: http://www.audiophile.no/en/articles-tests-reviews/item/426-amplifiers-with-processor-input
Brilliant article. Hopefully, someone can assist me here.
I am wanting to use my Arcam FMJ A28 with my Marantz SR9600 AV receiver.
I only want to drive front left and right speakers with the Arcam. I will connect various 2-Ch component direct to the Arcam.
I’ve got it working with pre-outs from Marantz AV receiver to any of the inputs in the ARCAM (excl. phono).
My problem is the ARCAM needs to on almost FULL volume to balance the sound out of the marantz.
Only option in Arcam menu is Prog Mode, but that just allows the volume to be fixed/variable.
Can anyone assist here?
If Pre-Out from an AV receiver is used to connect to Multichannel Inputs on another AV receiver, which one should be used for Calibration? What settings should be used on the other amp?
The logical choice would be the first AV receiver acting as a Pre-Amplifier. However, the reason for asking the question is that the decoding section of the second AV receiver acting as a power amp is also working and calibration/optimization choices might impact the overall sound!
How can I get sound on my smart tv going through my vincent 237
Hello and thanks for this great information. My question is whether a significantly lower powered vintage stereo Integrated Amp such as a mid 70’s 40 wpc Yamaha CA- 610 could be integrated via the pre out -then calibrate method with a Pioneer Elite with ICE amps to the tune of 120 wpc. Could the Yamaha hang with trying to match up with such different power/current? Ps. speakers are BMW CDM-7’s.
Thanks
Hi,
I have Pioneer SC LX83 and Focal 836 as main/front speakers. To improve stereo I am looking for integrated amplifier (thanks to this web source as I never thought about this option) with HT/MAIN IN and e.t.c.
One of pretenders may be Musical Fidelity M3I with HT IN input. The question- how to run Pioneer’s MCAAC calibration system when everything is hooked up? I am afraid and confused by words were written in Musical Fidelity Manual
MPORTANT: Take great care when using the input in HT mode. Ensure that the volume control is turned right down on the HT processor when first setting up. The HT mode is designed for sources which require their own volume control to be used. Connecting sources in HT mode with no volume control could result in damage to hearing and/or speakers due to uncontrolled loud sounds.
How to make calibration if I should keep Receiver Volume knob down to zero?
All your comments will be much appreciated. Thanks.
Is it possible to use a preamp in place of the integrated amp? I’m asking because I have an AV receiver with pre outs to a couple of power amps. Would I be able to co next my CD player to a pre amp, then feed this into one on my existing power amps?
Hi,
Great article, loads of constructive information.
I’d love to have your insights regarding my future home theatre system setup. I currently own a stereo setup which I would like to extend to the best possible home theatre experience.
Current set-up (stereo audio):
• Source: naim CD5XS
• Integrated amp: naim nait XS
• Speakers: ProAc Response D18
My objectives:
1. Setting up a home theatre system on top of my existing stereo setup (without hampering stereo performances), using my existing integrated amp (naim nait XS) and speakers (ProAc Response D18)
2. There is approximately 4 meters between the front (TV set) and back (couch) of my room. I would like to have no cables running from the front to the back of the room.
Target set-up (audio & video):
• Source: naim CD5XS, blue-ray player, TV set, etc
• Integrated amp: naim nait XS
• A/V receiver: ?
• Front speakers: ProAc Response D18
• Centre speaker: ProAC Center Voice
• Rear Speakers: ProAc tablette 10
Questions:
1. What do you think above the above target set-up?
2. Which A/V receiver would you recommend?
3. How to get rid of cables running from the front to the back of the room?
4. Would it be feasible to use the integrated amp for the rear speakers and the A/V receiver for the front and centre speakers? If yes, I would then use the ProAc Response D18 as rear surround speakers, place the naim nait XS (integrated amp) at the back of the room and the A/V receiver at the front of the room together with center and front speakers. What do you think? I would just then have this one “pre-outs” cable running from the front to the back of the room?
Thanks, a lot in advance for all your advices.
Cheers,
François
I have a yamaha RX-V3800 with pre-out in rear and front of the receiver .
I like to connect my QSC ISA750 to it , but rather connect it to the surround units , help please.
Hello, great article, I’ve been wandering if I could improve music listening with my surround system
I’m using denon x2700 receiver with monitor audio bronze 2 speakers.
Do you think adding an integrated amplifier like cambridge cxa61 would be a good improvement for my listening?. Or maybe a streamer and use the DAC and pre (cambridge cxn2).